Throughout our lives there are times when we are working towards personal goals. Goals are important but it can be challenging to track your progress while juggling the distractions and everyday challenges of life.
How many times have you started a goal, failed and had little information to help you understand why you failed?
Wouldn't it be helpful if you had an easy way to collect data on your behavior for further analysis? How do you build a system to analyze your life?
In this post I'm going to teach you a how to built your own personal intelligence system. This system can be used to track, monitor and analyze your life as you work towards your goals.
Before we dive in check out the screenshot below from my personal budget dashboard. By the end of this post you'll have the skills and knowledge to build your own dashboard to track any of your personal goals.
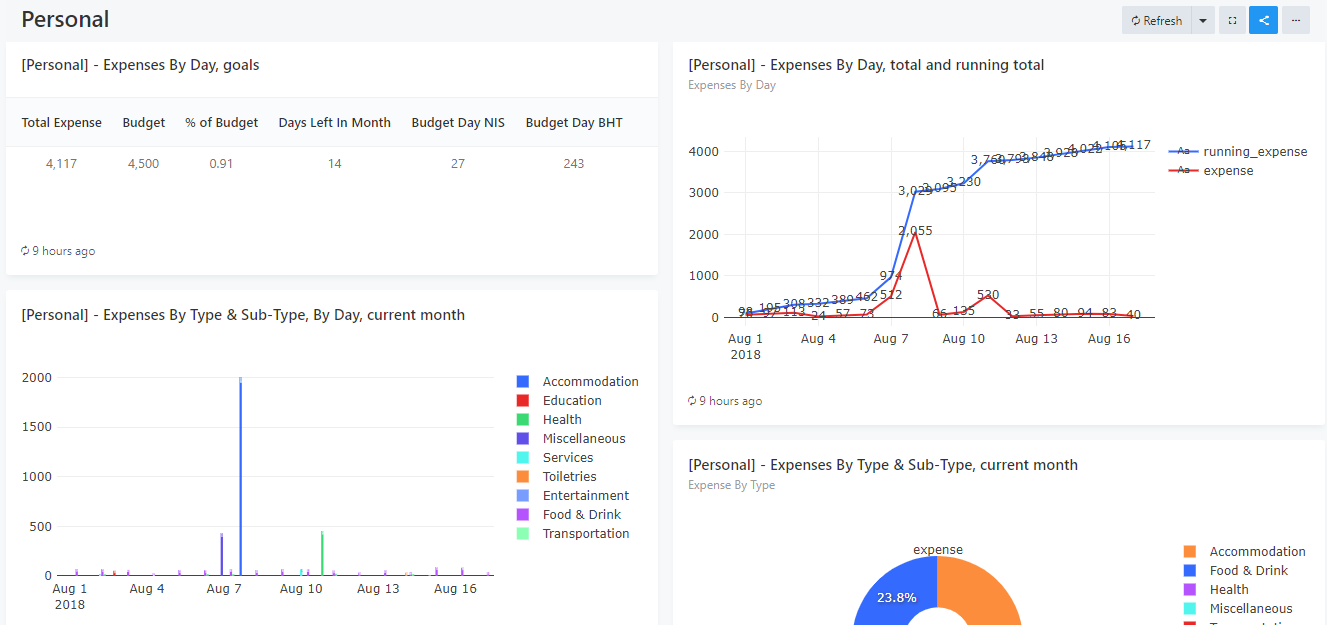
The system to analyse your life like a business analyst
The most important lesson from this post is to understand that the steps below teach you how to create a system which can be used to track a wide range of personal goals and other aspects of your life.
The system has three main parts.
Part #1: Data collection
The first part of the system is data collection. Without data we have nothing to work with. The first few steps in the example below will teach you a quick and easy way to collect rich data that we can leverage later in the process.
Part #2: Data hosting
The second step is to build an automated process for moving our data into a cloud-based data warehouse. This will maximize our ability to leverage the data we are collecting.
Part #3: Data Visualization
The last part of the model is to mold our data to our needs and display it on a dashboard for easy consumption.
The rest of this post will walk you through setting up the system with a real example, budget tracking.
Other examples where the system can be used include:
- Track your workouts and physical goals (miles run, push-ups completed, weight lifted)
- Tasks completed
- Blog posts published / words written
- Reading sessions completed
- Pomodoros completed
If you follow the steps below and understand the core principles, you'll be able to build a model to analyze your life like a business analyst would analyze the health of a company.
To build the system you'll need some experience in SQL and patience since you'll be signing up and using a few tools which you may not be familiar with. It will take you somewhere between 1 - 3 hours to set this up, depending on your technical skills and familiarity with these tools.
The tools involved include:
*The tools listed above are my favorite and I recommend them but you can replace all of them with alternatives and you should be able to achieve the same goal.
Use Case: Budget Tracking
Sticking to a budget is tough. Depending on where you are and your lifestyle you may have dozens of transactions a week. Those coffees and drinks after work add up and before you know it you've over extended yourself.
I'm excited to share with you a real-life example of my system in action. I used my system for the entire month of August to help me better understand my buying habits and track my spending.
Let's get started shall we.
Step #1: Create your raw data spreadsheet
The first step is to build a Google Spreadsheet which will be used for tracking the raw transaction info.
The columns you'll want to add include:
- Date -- When the transaction happened.
- Amount -- The cost of the transaction.
- Type / Category -- The main grouping of the transaction. Examples will include "Accommodation", "Food", "Health".
- Sub-type / Sub-category -- A secondary grouping for the transaction. This will help you do deeper dives. Examples may include "Eating Out" and "Home Cooking" for "Food" and "Taxi" or "Bus" for "Transportation.
- Description -- Allow you to provide context and any other useful information.
Since I'm location independent and traveling quite a bit I included a currency field which I use to normalize all expenses to Israeli shekels, my primary currency.

Step #2: Sign up with Typeform and create a form
Typeform is a great service because it just works. There are dozens of form providers out there but TypeForm are dominating because of their focus on usability, design and integrations with hundreds of other apps.
Once you've signed up with your free Typeform account you want to create your first typeform.
The form should include a question for amount, type, sub-type and any other information you will be saving in the form. Don't create a question for "Date" since we will be getting this information automatically.
You'll want to come up with your own list of types and sub-types but to give you some ideas I've included my lists below.
Types
- Food & Drink
- Gifts
- Transportation
- Utilities
- Insurance
- Accomodation
- Services
- Toiletries
- Health
- Office Supplies
- Education
- Entertainment
- Banking
- Miscellaneous
Sub-types
- Accountant
- Alcohol
- Apartment
- Arnona
- Barber
- Bus
- Cash Withdrawal Fees
- Cellphone
- Cinema
- Eating Out
- Electricity
- Gym
- Health Insurance
- Homecooking
- Hotel
- Internet
- Kindle Ebook
- Laundry
- Life Insurance
- Loan Payment
- Maccabi
- Software-as-a-Service
- Taxi
- Water
- Wedding
- Whey Protein
The amount field should have the numerical type, type and sub-type should be "multiple choice" and all fields but description and sub-type should be set as required.
There is no need to add a welcome screen or any other design extras since you'll be the only one using the form. Keep it simply.
When you're done with your typeform test it to make sure it works as expected.
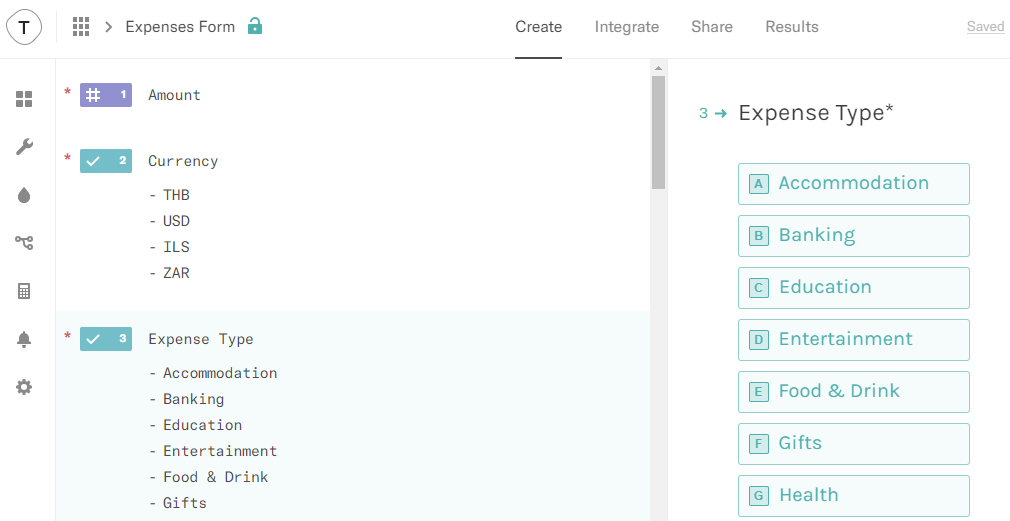
Keep the form basic. Only include questions that relate to the information you want to save.
Step #3: Copy the Typeform link and add it to the home screen on your mobile device
Next up you want to make it super easy to access the form you just created by adding a direct link to it on the home screen of your phone. This will make it very easy for you to open the form and since it will be on your home screen it will be a constant reminder that you should use it. I've included two videos below which will help you save a link to the form to your phone's home screen.
Once you've added the shortcut to your home screen tap it to test if the form opens. You'll notice that Typeform's forms look amazing on the mobile.
I can't stress enough the importance of this step. You want to make things as simple as possible so that you can easily develop the habit of recording the data you'll need. Putting a link to the form on the screen which you look at a hundred times a day will help you create this habit.
Step #4: Sign up to Zapier and create your zap
If you've never heard of Zapier or have no interest in signing up to the service then you can actually achieve the same thing by activating Typeform's integration with Google Sheets. Zapier is a service that makes it easy for your apps to talk to each other. Zapier has a generous free plan which should be enough for your system.
Since I used Zapier in my system I'm going to walk you through setting it up.
The zap you want to create has TypeForm as the "trigger" app (new entry being the actual trigger) and Google Sheets as the "action" app. The idea being that each time you submit the form you'll create a new row in the raw data spreadsheet we created in step 1.
The trickiest part is mapping the form fields to the spreadsheet columns. For the date field select "Submit Date" from the list of variables which will appear when you click on the icon in the far right hand side.

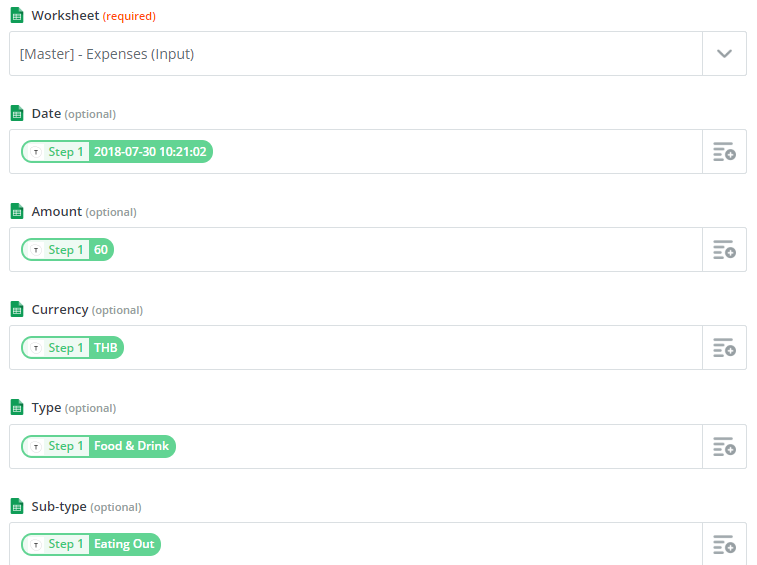
Once the zap is ready run a few tests to see if your Spreadsheet gets populated with data. Zapier's integration with TypeForm supports instantaneous triggers so you should see data appear in your spreadsheet immediately after submitting your TypeForm.
Step #5: Create new spreadsheet for calculations and massaging of the data
Good work. You now have a process where you can easily populate a Google Sheet with data. The issue is that this data is not "BI" friendly enough for us. Since Zapier creates a new row each time you'll submit the form we have a challenge. Note that I mentioned that Zapier creates a new row, it doesn't populate an existing row. This means that we can't add helper columns and other calculations to our raw spreadsheet and have them work consistently.
The next step is to create a new spreadsheet which will mirror the raw data but allow us to manipulate the data and add to it. The formula you'll want to consider for this purpose is arrayformula.
Below is a screenshot of my second spreadsheet. You'll notice that I'm calculating the currency conversion rate for the given currency on the day the transaction took place. This will most likely be over kill for you but since I'm traveling a lot and buy a bit online I like to normalize all my expenses to shekels.

The most important reason I created this second spreadsheet was to convert the timestamp string from Zapier into a date.
Step #6: Mirror the spreadsheet to BigQuery
At this stage you can go a head and connect your spreadsheet to a dashboarding tool like Cyfe or Dasheroo. This should be more than enough to build some basic views to monitor your monthly expenses.
If you want to get fancy I recommend "moving" the data to Google BigQuery. This is going to allow us to query the data from Redash and other more sophisticated BI tools like PowerBI or Tableau.
Note that if you have zero SQL experience then don't even bother trying to move your spreadsheet into BigQuery. The only exception is if you want to use a data visualization tool which doesn't have a connector to Google Sheets but has a connector to BigQuery.
Google BigQuery is a cloud-based data warehouse. It has a bit of a learning curve but it's a great product and very powerful for getting more value from your data.
How to push google sheets data into BigQuery?
Once you've set up your first project on Google Cloud Services you'll want to navigate to the BigQuery console.
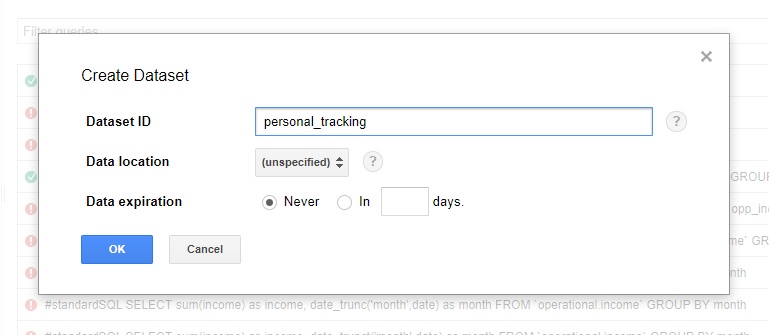
Once you're in the console create a dataset by clicking on the drop down menu next to your project.
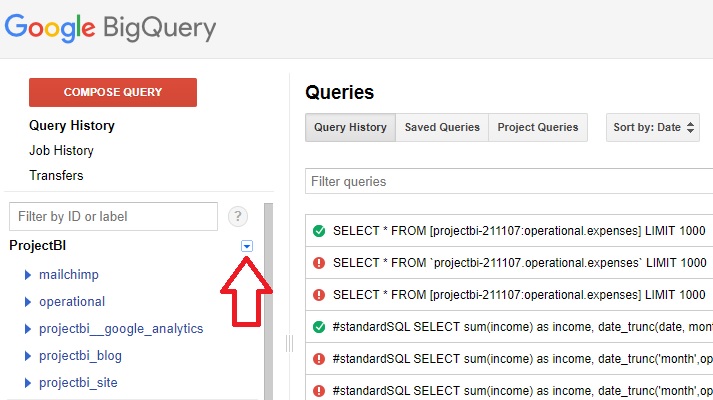
Give the dataset a name and leave the rest of the fields as is. Click on "OK".
Next you'll want to create a new table within the dataset. You can do this by hovering over the name of the dataset you just created and then by clicking on the drop down and then on "Create new table".
In the "Create Table" screen you'll want to select Google Drive from the Location drop down menu. In the field that appears enter in the shareable link of the second spreadsheet we created. You can get this link by right clicking on the spreadsheet in drive and clicking on "Get Shareable Link".
Next you want to give your table a name. Make the name all lowercase and don't add in any special characters or numbers if you can avoid it. Click on the "Automatically detect" checkbox next to schema. If you've followed this guide closely and not done anything out of the ordinary to your data then Google should be able to map your data to the correct datatypes.
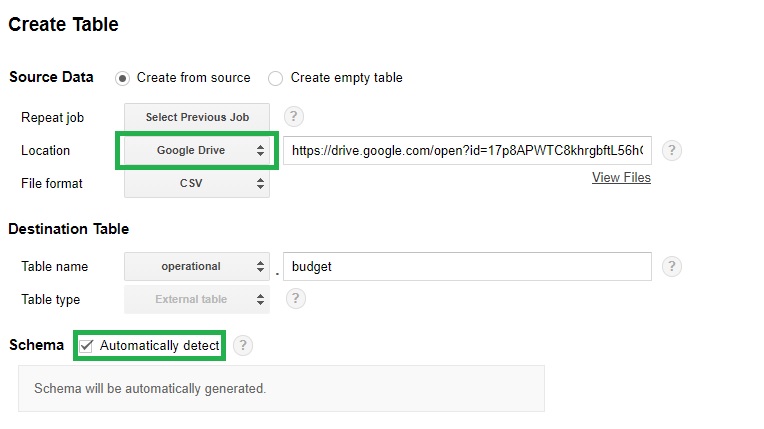
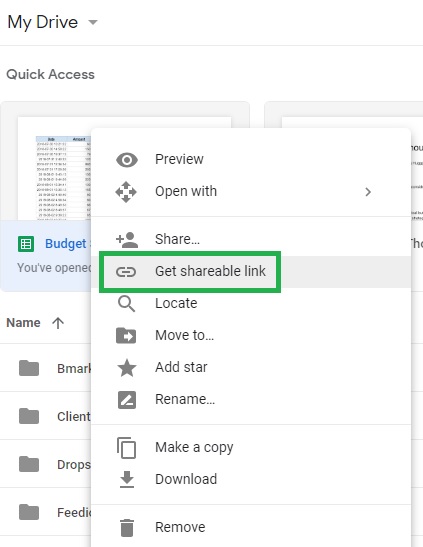
When I set this up I had to repeat the process a few times because of how I labeled my columns and structured my data. You can easily delete the table if you aren't happy and repeat the process until it's set up to your liking.
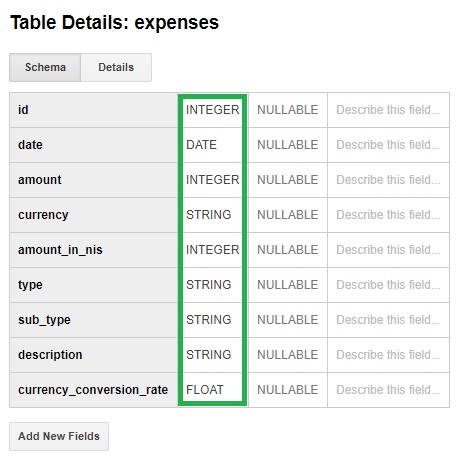
Once you're done creating the table you'll be shown the schema of the table. Go through the fields and datatypes to make sure everything is there and that each field has the correct datatype.
Step #7: Connect BigQuery to Redash
Redash is a very powerful tool which I highly recommend for businesses that want to be more data-driven. What makes Redash special is that it acts as a layer between your data silos and data visualizations.
Redash also offers data visualization which makes it perfect for our needs.
Once you've created your Redash account you'll want to add BigQuery as a datasource. This step can be a bit tricky and annoying because Redash doesn't offer a standard oAuth connection to BigQuery like you find in Tableau. They do have this useful guide though and if I can work it out, so can you.
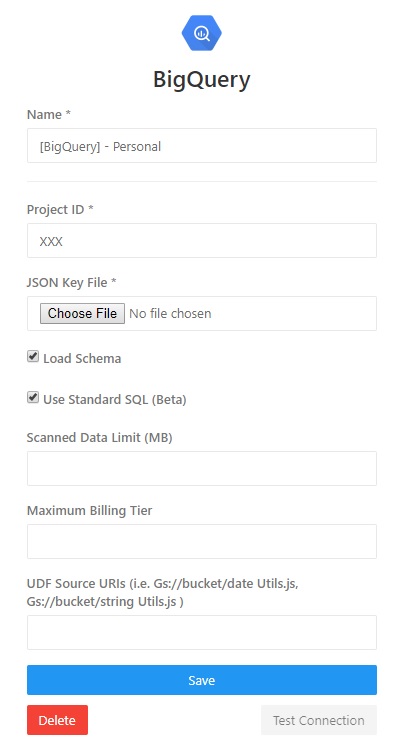
Once you've managed to connect Redash to your BigQuery project you'll be able to start creating queries and visualizations.
Step #8: Create queries in Redash
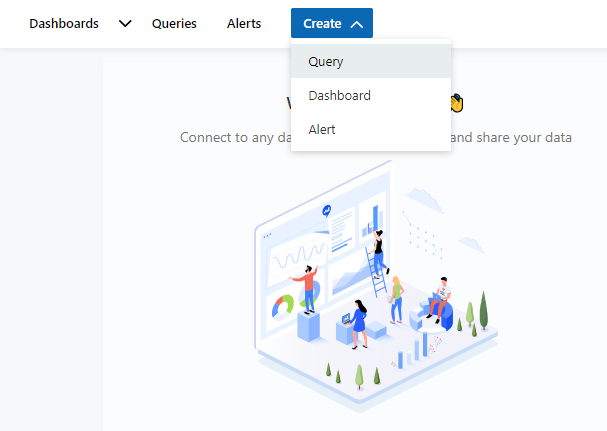
To create a new query in Redash, click on the big blue create button and select Query.
Below is a screenshot of a query I built. You can use my screenshot to navigate the query creation screen.
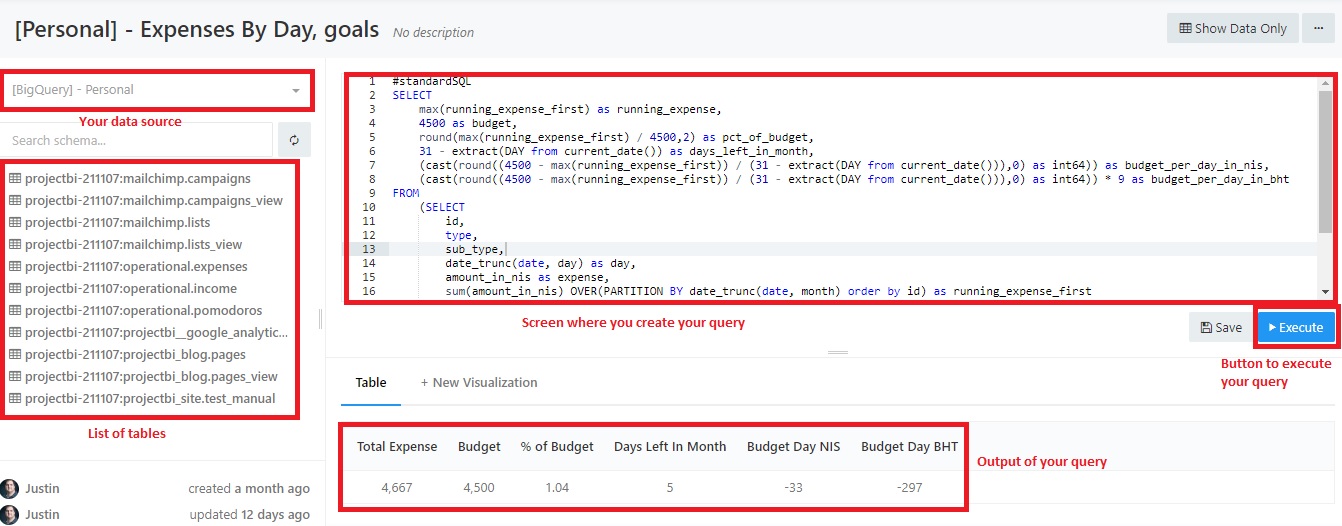
An important thing to remember is that even though you're using Redash to query your BigQuery data warehouse, you'll need to structure your query to be "BigQuery friendly". BigQuery over complicates things a bit when it comes to SQL and I recommend reading about the differences between standard and legacy SQL in BigQuery before trying to write your query.
Once you've created your query click execute and check out the output in the table view under your query. If you're happy with the output then save your query and publish it.
Create as many queries as you like and spend some time building visualizations by clicking on "+ New Visualization" just above your output.
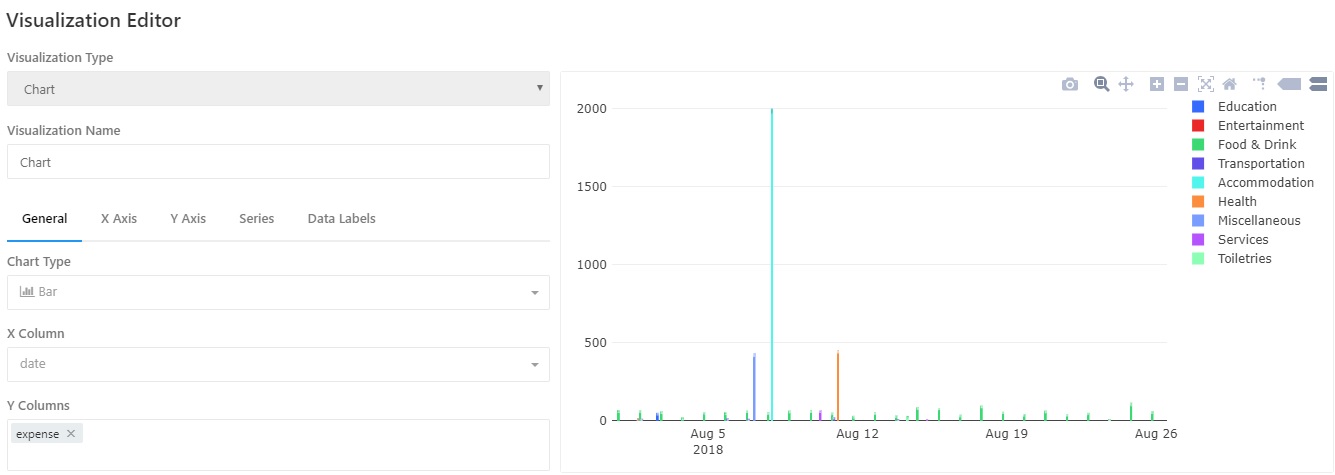
The viz builder has a bit of a learning curve but it isn't too complicated and quite versatile. There are a number of view types to choose from.
Step #9: Build your dashboard
The final step in this process is to take your visualizations and put them on a dashboard for easy consumption. To create a dashboard follow the same steps you took to create a query but select Dashboard from the drop down instead of query.
Give your dashboard a name and then click on "Add Widget" in the bottom corner of the screen, pick the relevant query and then the relevant visualization. Redash makes it easy to create many visualizations from the same query.
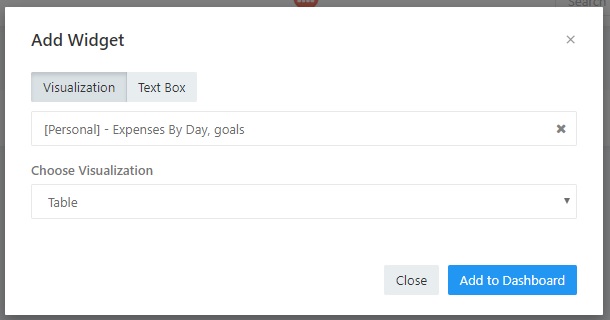
Once you're happy with your dashboard publish it and you're done.
Once your dashboard is published you can click on the share icon in the top right hand corner of the dashboard to generate a public share link. You can then add this link to your browser's bookmarks or share it with an "accountability buddy".
Step #10: Monitor and analyze your life for maximum gains
Now that the system is in place you have everything you need to analyze your life like an analyst. You have the infrastructure to run complex analyzes on your failures as well as the means to monitor your progress daily, weekly and monthly.
Redash's querying infrastructure makes it convenient to create a set of queries which you can return to for ongoing analyses.
I'd recommend adding tasks to your calendar to run in depth analyses every quarter when you reflect on your progress.
Tools like Zapier and Redash can be used to create alerts and other sophisticated workflows to help keep you motivated and on track to crush your goals.
Summary
"What gets measured gets managed" is often used in the context of business, but it can also be applied to our personal lives. The model that I've taught you in this post can be used to track, monitor and optimize any personal goal which fits the SMART goals model.
If you've grasped the core principles in this post and understood how easy it is to collect and manipulate data then you're on your way to building out your own personal business intelligence system.
Once the system is in place you can spend time building out different dashboards for monitoring your progress, and more importantly, allow you to analyze your failures.
It is easier than ever to track your life like an analyst so you can make big gains in your health, wealth and career.


